1. Introduction
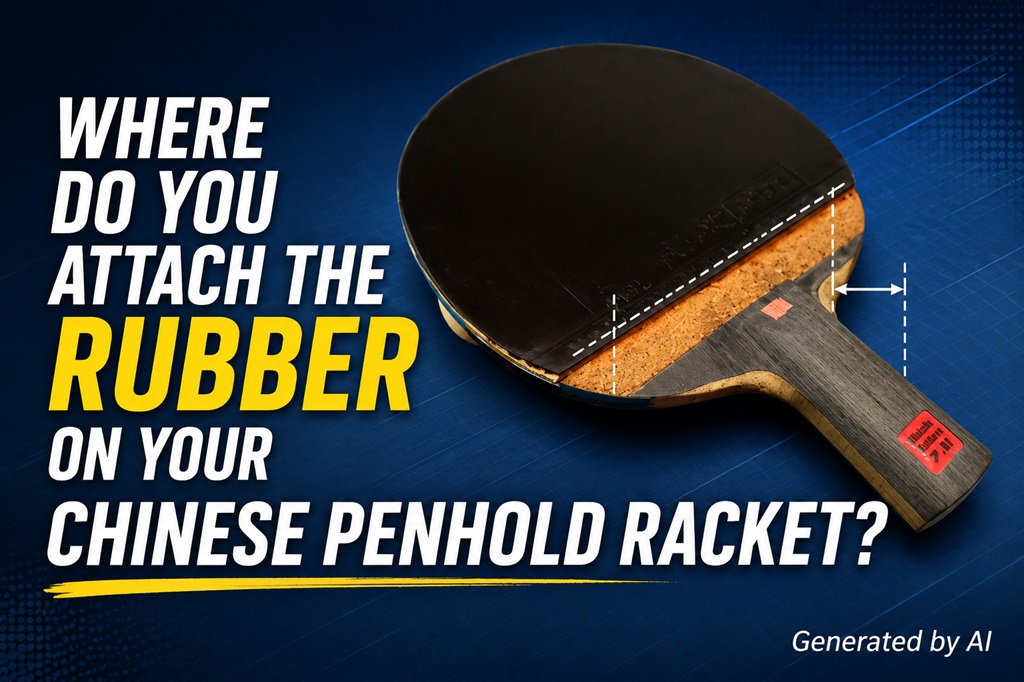
Where do you attach the rubber on your Chinese penhold racket?
With a Japanese penhold racket, the handle is covered with cork, so players typically leave a small gap between the rubber and the handle.

Unlike Japanese penhold rackets, Chinese penhold rackets do not have a cork-covered handle. This gives players much more flexibility in deciding where to place the rubber.
Even among world-class players, there is no single standard. Some leave a small gap between the rubber and the handle on the forehand side, while others appear to attach the rubber almost right up to the handle.
In other words, there is no universally correct way to position the rubber.
The position of the rubber can affect the racket’s weight balance, grip feel, forehand-backhand transitions, and overall playing feel. That’s why it’s important to choose a setup that suits your own style.
In this article, we’ll look at three common ways to position the rubber on a Chinese penhold racket and discuss the advantages and disadvantages of each.
2. Common Rubber Placement Styles for Chinese Penhold Rackets
Note
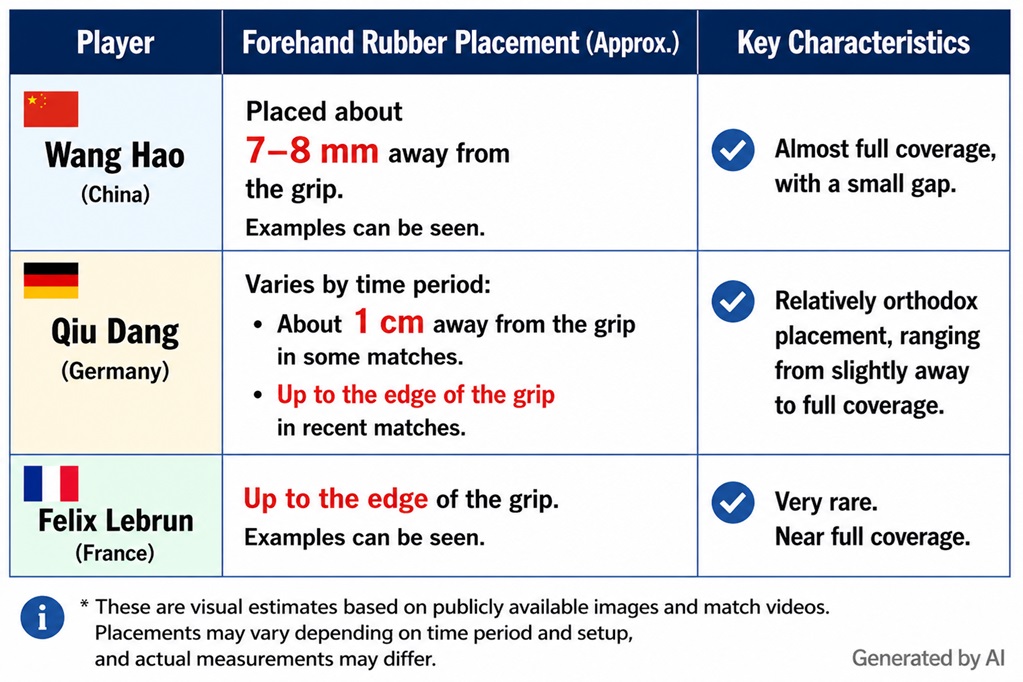
Many players leave a small gap of a few millimeters to about 1 cm between the forehand rubber and the handle. Based on match footage, Wang Hao also appeared to use this setup during certain periods of his career.
Some top players leave a noticeable gap between the rubber and the handle, while others appear to attach the rubber almost all the way to the handle. In some cases, even the same player may change their setup over time.
As these examples show, even world-class players do not necessarily stick to one rubber position. Their setups may also evolve over time.Ultimately, the best setup is the one that suits your playing style.
The most common rubber setups can be divided into the following three patterns:
- Pattern 1: Cover the entire blade on both the forehand and backhand sides.
- Pattern 2: Leave a small gap on the forehand side so that your thumb and index finger do not touch the rubber, while covering the entire backhand side.
- Pattern 3: Leave a small gap between the rubber and the handle on both sides.
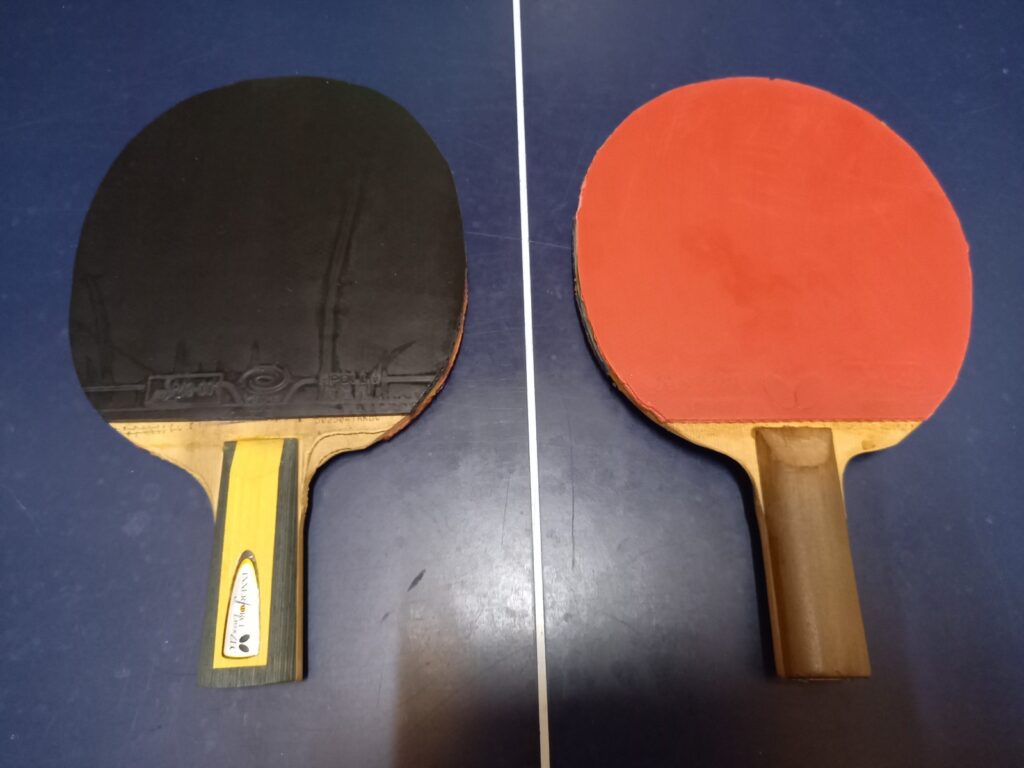
Example: Full Coverage
- Left photo (forehand): The rubber is attached about 7–8 mm away from the handle.
- Right photo (backhand): The rubber extends all the way to the handle.
Example: Rubber Attached Slightly Away from the Handle
- The gap is large enough that the thumb and index finger do not touch the rubber.

3. Analysis of Each Rubber Placement Style
(1) Cover the Entire Blade on Both Sides
- The center of gravity shifts closer to the handle, which may make forehand-to-backhand transitions feel quicker and easier.
- On the forehand side, your thumb and index finger may touch or even rest on the rubber, depending on your grip.
As a result, the racket angle and grip feel may differ from what you are used to, making this setup a matter of personal preference.
Many players leave a small gap of a few millimeters to about 1 cm between the forehand rubber and the handle.
On the other hand, some top players, such as Félix Lebrun, appear to position the rubber almost all the way to the handle.
I also tested this setup by covering the forehand side more completely than before. The changes in racket angle and ball feel were greater than I expected. I discuss my detailed impressions and review in a follow-up article.

(2) Leave a Gap on the Forehand Side / Cover the Entire Backhand Side
- You can maintain a grip feel similar to that of a Japanese penhold racket.
- Keeping full coverage on the backhand side shifts the balance slightly toward the handle, which may improve maneuverability and make forehand-backhand transitions easier.
The overall balance is roughly midway between Patterns (1) and (3).
(3) Leave a Gap on Both Sides
- This setup uses the least amount of rubber, making it easier to reduce the racket’s overall weight.
- A lighter racket may feel easier to swing.
- With the balance shifted slightly toward the head, some players feel more racket-head acceleration and centrifugal force, which can help generate more powerful topspin shots.
Author’s Current Setup
I currently use Pattern (2).
Since I originally switched from Japanese penhold, I prefer leaving a gap on the forehand side because I find it uncomfortable when my thumb and index finger touch the rubber.
On the backhand side, however, I use full coverage to keep the racket’s balance closer to the handle.
If your priority is to make the racket as light as possible, Pattern (3) is also an excellent option. I used this setup in the past and found that reducing the rubber area lowered the racket weight by at least about 5 grams.
4. Conclusion
There is no single best way to position the rubber on a Chinese penhold racket. The ideal setup depends on your personal preferences and playing style.
That said, you can choose a setup based on what you want to prioritize in your game.
(1) Cover the Entire Blade on Both Sides
- Keep in mind that this setup also results in the heaviest racket.
(2) Leave a Gap on the Forehand Side / Cover the Entire Backhand Side
- You prefer the racket’s balance to stay closer to the handle for easier transitions and better maneuverability.
(3) Leave a Gap on Both Sides
- You want to make the racket as light as possible.
Personally, I never considered Pattern (1) in the past.
However, some top players appear to leave a small gap between the forehand rubber and the handle, while others position the rubber almost all the way to the handle. Players may even change their setup over time.
These examples suggest that there is no universally correct rubber position, even at the highest level of table tennis.
I also experimented with covering more of the forehand side and found that having my thumb and index finger rest on the rubber changed the grip feel and racket angle far more than I had expected.
If you’re interested in this setup, be sure to check out my follow-up article, where I explain the advantages, disadvantages, and my hands-on experience in greater detail.
Even a small change in rubber position can noticeably affect the racket’s balance, grip feel, and overall playing characteristics. I encourage you to experiment and find the setup that works best for you.


コメント