How often do you change your table tennis rubbers?
As a working professional, I can only secure about 5 to 6 practice sessions a month (roughly 2 hours each). Because of this, my rubbers last a remarkably long time—I only need to change them about once every six months.
In this article, I’d like to talk about the characteristics of water-based glue for beginners.
Volatile (VOC) glues were banned back in 2007, and we switched to water-based alternatives. However, even among veterans, I still see people with a “wrong understanding” of how to apply them. So, I thought it would be a good time to revisit the key precautions for a perfect finish.
2.How to Glue Your Rubber
While there are many guides available on how to glue rubber, I have provided a link to the official Butterfly (a leading table tennis manufacturer) website for your reference. Please feel free to check it out if you’re interested in seeing their official instructions.
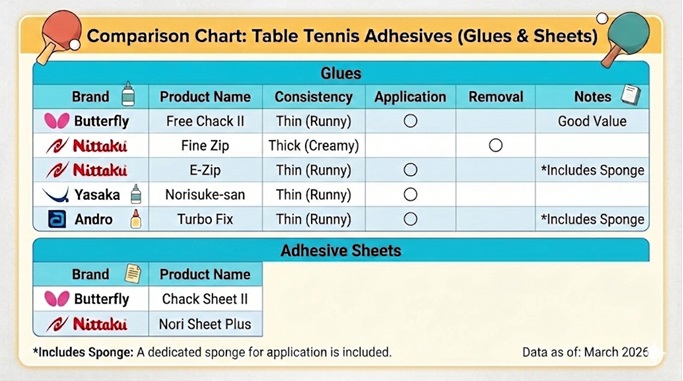
Here is an overview of the main adhesives currently available on the market.
(1)Properties of Water-Based Adhesives
Water-based glues can be broadly categorized into two types based on their consistency: “Thin (Runny)” and “Thick (Creamy).”
①Characteristics of Thin (Runny) Type
Ease of Application: The runny consistency makes it easy to apply an even layer without streaks.
Weight: It allows for a very thin adhesive layer, which helps keep the overall weight of the racket slightly lighter.
Removal: Because the dried film is so thin, it can be difficult to peel off the glue residue once the rubber is removed.
②Characteristics of Thick (Creamy) Type
Ease of Application: Due to its thickness, applying it perfectly evenly can be slightly more challenging.
Weight: The adhesive layer becomes thicker, which may result in a slightly heavier racket.
Removal: The thicker film makes it much easier to peel off the glue residue in one piece when replacing rubbers.
(2)Reference: Adhesive Sheets
Some manufacturers offer “Adhesive Sheets” instead of liquid glue. Simply put, these are double-sided tapes designed specifically for attaching table tennis rubber.
Primary Use: These are mainly used for “OX” (no sponge) long pimple rubbers, which are difficult to attach using liquid glue.
Cost Performance: At around 200 yen per sheet, they are less cost-effective than liquid glue.
Usage: While they are generally not used for rubbers with sponges, using them is perfectly legal under official ITTF rules.
4.Which Type Should You Choose?
Based on the characteristics mentioned above, here are my recommendations for choosing the right adhesive.
(1)Thin (Runny) Type is Best For:
・Players who want to keep their racket light.
・Players who are not confident in applying glue evenly.
・Players who do not re-glue their rubbers until it’s time for a full replacement.
(2)Thick (Creamy) Type is Best For:
・Players who do not mind a slightly heavier racket.
・Players who are confident in their ability to apply glue smoothly.
・Players who frequently re-glue or swap their rubbers.
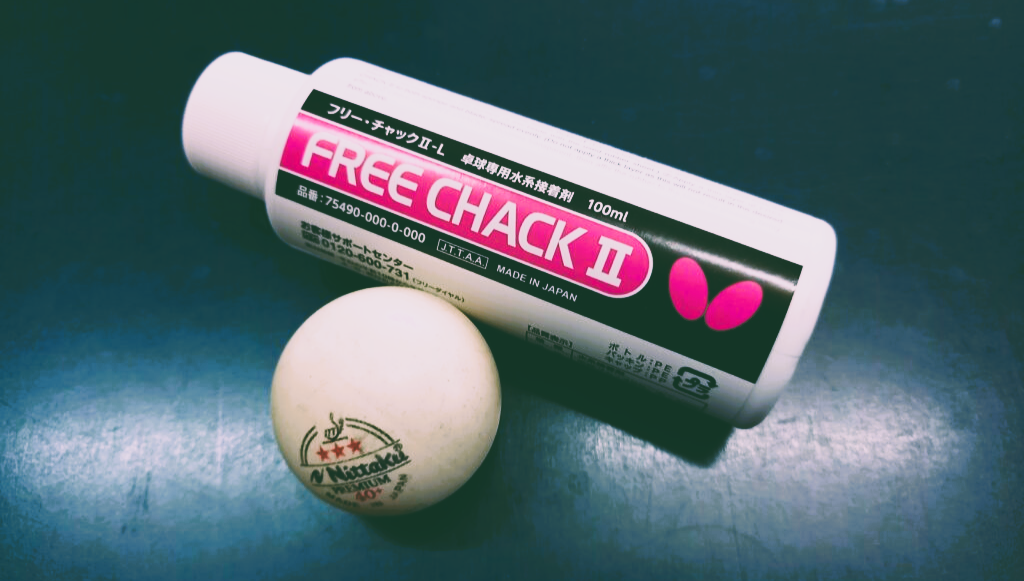
Author’s Choice Personally, as a Chinese Penhold (CPen) player, I am very sensitive to the overall weight of my racket. Therefore, I always choose the Thin (Runny) type.
Furthermore, because it offers excellent value for money (cost-performance), my go-to favorite is “Free Chack II” by Butterfly.
5.Key Points to Remember When Gluing Your Rubber
(1)Stop Using Rollers!
When it’s time to attach the rubber to the blade, some players use a roller or a cylindrical object (like a rubber cleaner bottle).
I understand the temptation—you want to avoid any air bubbles between the rubber and the blade. However, you should stop doing this!
Using a roller stretches the rubber while you are applying it. Once attached, the rubber will gradually try to shrink back to its original size. This unintended tension can actually decrease the rubber’s intended performance.
(2)Apply the Adhesive in a Thin Layer
Back when “Speed Glue” (volatile glue) was popular, players used to apply multiple thick layers to “dope” the rubber for extra bounce. However, with today’s water-based adhesives, this has the opposite effect!
Applying multiple layers of water-based glue creates a thick barrier that actually reduces the rubber’s repulsion and elasticity.
【Important Considerations】 For modern “Tension-type” rubbers with large pores in the sponge, the bonding surface is smaller, making them more prone to peeling off.
If using Thick (Creamy) glue: These have stronger adhesive power, so one layer is usually enough.
If using Thin (Runny) glue: It is recommended to apply one layer, let it dry completely, and then apply a second layer to ensure a secure bond.
6.Conclusion
I hope you found this deep dive into table tennis adhesives helpful!
As we’ve discussed, water-based glues come in two main types: “Thin (Runny)” and “Thick (Creamy).” By understanding the unique characteristics of each, you can choose the one that best fits your playing style and equipment needs.
Also, please keep in mind that with modern water-based adhesives, applying too many layers can actually reduce the rubber’s repulsion and elasticity. Less is often more when it comes to achieving peak performance.
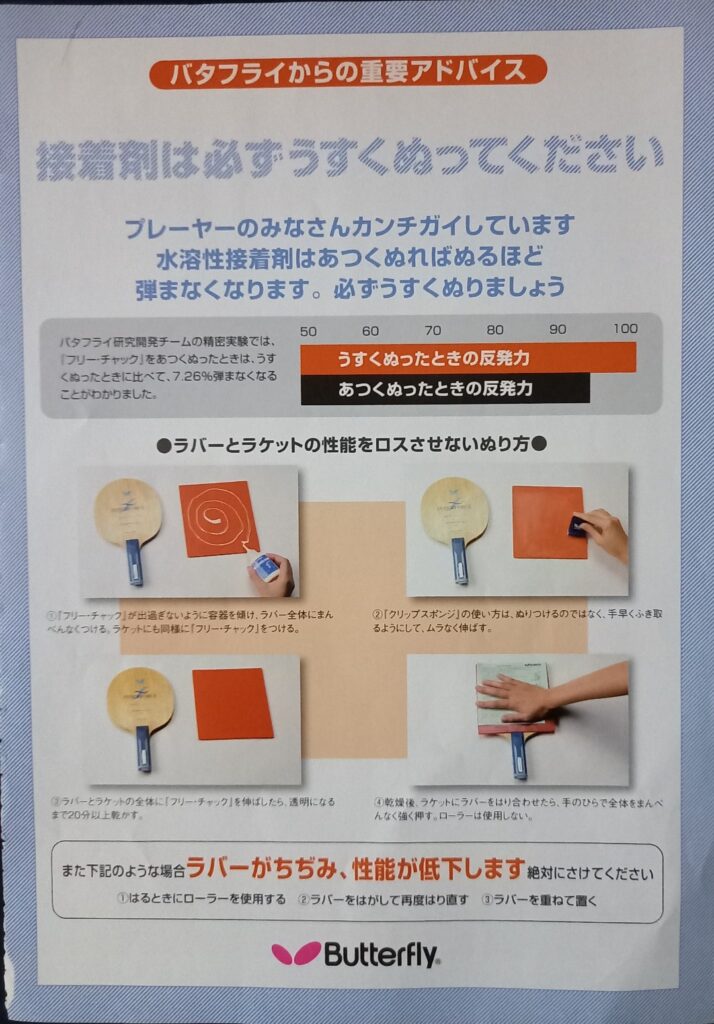
Below is an official safety and precaution notice from Butterfly.
Source: Butterfly
English Translation: Important Advisory from Butterfly
Important Advice from Butterfly Adhesive Must Be Applied in a Thin Layer! Many players have a misconception: With water-based adhesives, the thicker you apply it, the less bounce you get. You must apply it thinly!
The Science of Repulsion In precision experiments by the Butterfly R&D team, it was found that applying “Free Chack” thickly resulted in 7.26% less repulsion compared to a thin application.
Thin layer: 100% Repulsion (Reference)
Thick layer: Significantly reduced Repulsion
● How to Apply Without Losing Performance ● Application: Tilt the “Free Chack” bottle carefully so it doesn’t spill, and apply it evenly to the entire rubber surface. Apply to the blade in the same manner.
Spreading: When using the “Clip Sponge,” do not press down hard. Instead, spread the glue lightly and evenly as if you are gently wiping the surface.
Drying: Once spread over the rubber and blade, let it dry for at least 20 minutes until the glue becomes completely transparent.
Attaching: After drying, align the rubber with the blade and press down firmly with your palm across the entire surface. Do not use a roller.
⚠️ ABSOLUTELY AVOID THE FOLLOWING: Doing these will cause the rubber to shrink and its performance to decline:
Using a roller when attaching the rubber.
Peeling off the rubber and re-attaching it.
Stacking rubbers on top of each other.
● Photos are available via the links below! Even if you don’t read Japanese, the product pages have helpful photos.
Coming soon! We are working on adding international affiliate links for your convenience.


コメント